In short: fuck electric scooters, electric bikes as well as any other similar things that are electric but not an EUC, nor a car. Maybe unless you need to pull a trailer:

Or transport a big computer across NYC.
Chapter 1: Ninebot One S2
Someone named letoram said in a place named #lobsters that electric unicycles are fun, and that they feel like you’re about to fall at any time, which got me curious and deserved some experimentation. For my first wheel, I had no idea what to look for and just bought the S2 since it was cheap-ish, and no one told me not to.
It took a while to get the gist of the controls, but on my second day I could already ride around somewhat well and… pinched my inner tube when hitting a kerb. Then I had to order some tools, dismantle the whole wheel, and learn how to repair bike tyres on hard mode. (I assembled it wrong the first time, pinching a cable—just fixing this took me about an hour.)
Very shortly this wheel became too underpowered for me, even though I’m fairly light and the motor can take me up some surprisingly steep slopes, if barely.
Positives:
-
The shell is indestructible.
-
Relatively light and easy to travel with. Carry it by its handle, or throw it under your trolley (which then becomes hard to manoeuvre).
-
A fairly cheap option for when you’re not sure about EUCs, though irrational if there’s any chance at all you might find a use for it. I’d get a used one for cheaper if I had the choice and option. Or an upgrade in a similar weight category, such as InMotion V8F.
-
The pedals are low, making this vehicle relatively easy to get on.
-
Underpowered, hence you can just walk away from many incidents rather than fall flat on your face. You don’t really need a full face helmet here.
Negatives:
-
The device needs a phone to activate, and to change the few settings it has.
-
Annoying, loud beeping that cannot be disabled. Often, when it falls, it just won’t stop until you turn it off and on again. It goes without saying that this attracts a lot of undesired attention.
-
The shell hurts to lean against, e.g. when riding on only one leg. It can be alleviated with a layer of rubber. Simply wearing shin guards helps a lot, too.
-
There’s nothing at all to help you keep your feet on the pedals if you jump down with it, thus you may easily shift position and even fall forward. You can find attachments that fix this issue, which is common to most wheels.
-
Underpowered, hence boring. Neither is it good for the pavement due to being rather fast, nor for the road due to being rather slow.
-
No headlight for when it’s dark outside. Holding a flashlight in hand is heavily suboptimal, if only because a much lower position is necessary to see road irregularities well.
If you need a charging/storage stand, cut the cardboard box it came in to fit just the lower block of polystyrene foam. Works pretty well, just beware of free spinning, that’ll do some damage to it.

Learning to ride
In a few days of actual practice, you’ll be almost literally flying around, with ease. It feels amazing. It can also be a decent leg exercise, especially at the beginning, when you try to use the wrong muscles. Despite my fears, my sometimes aching knees don’t seem to mind, almost to the contrary. But feet like to hurt, and you can easily get cramps. Good shoes help.
Learn on a hard surface, and remember that it’s more stable when it’s moving. It helped me to imagine that I’m getting on a skateboard.
Tricks
It doesn’t take much effort to learn to ride on one leg only—you do this anyway when getting on, so just keep prolonging the duration—it’s just physically demanding, and hurts after a while.
Jumping down kerbs is fairly safe but requires some practice. See also the list of S2 negatives above. Shallow and sloped kerbs can more or less be simply driven through. Ideally, find a nearby skate park to train your balance. I was quite surprised by the slopes I could easily go up and down.
Riding backwards seems doable, but my progress with it has been slow so far.
Important takeaways
-
Always check tyre pressure when unsure. Extracting the inner tube is usually a very, very laborious process. Consider carrying a tube sealant when going off-road.
-
Make sure to wear protection if you suspect that you might fall. Ideally also learn how to fall so that harm is minimised, e.g., by twisting your body sideways when falling backwards, or not stretching out your hands fully in front of you when falling forwards (ideally, you want to turn that into a roll, or slide on wrist guards).
-
Be extremely careful when driving through bus stops, you may easily run into people, especially with those stepping out of any bus. Try to avoid busy footpaths altogether, if possible.
-
Excess acceleration and braking cycles lead to overheating.
Chapter 2: Upgrading to InMotion V11
As a follow-up machine, I first considered the powerful and sturdily built Veteran Sherman, but eventually fell in love with the idea of a city-friendly commuter wheel that is InMotion V11. Seeing as a V11F was unlikely to appear anytime soon, and that I felt ready to ride faster than 24 kph, I bit the bullet, ordering this pricey monster of a wheel.
At 27 kilograms, just extracting it from its box was quite difficult. All of its shock absorbers were empty, so I had to pump them up, disassembling the shell in the process. The attached air pump could be better, but it does its job. Given how little I weigh, it was slightly easier for me to pressurise the bottom shocks accurately with a regular, low-pressure pump. It couldn’t make a good seal with the tiny upper chambers, however.
The riding experience is very different. Whereas the 14" S2 is nimble, this 18" tank just wants to go straight ahead, and pedals are positioned so high that getting on requires a lot of getting used to (I still can’t do it reliably). Accelerating or decelerating is by no means easy either, as you need to pinch the wheel between your legs for leverage, and put in considerable effort—otherwise you simply won’t extract the full power. It seems that one has to install some power pads, sooner or later.
Driving at night
Overall, the V11 simply isn’t made for the pavement. Which leaves me with two other options: trail paths, and public roads. Since I strongly prefer concrete over nature (yuck, spider webs and stones), and don’t feel comfortable in traffic yet, I went for exercising the ridiculous range of my device on the road, at night.

Which turns out to be great. With virtually no cars around, I rarely need to stop to give way, and I can afford to ride in the centre of the lane most of the time. In a short while, I ended up increasing the wheel’s speed warning to around 45 kph, often getting close to that speed around town—and without fearing for my life. The air suspension takes care of potholes and bumps rather well. When I get the occasional wobbles, I slow down, shift my position, maybe carve for a bit, and it tends to go away. Interestingly enough, I only get a sore groin, though there’s certainly some overall leg fatigue, too. Generally speaking, I’m having a ball.
Okay, I admit there was an accident where I ended up running right into a random, unexpected kerb. Luckily, I could simply switch to walking at that time, and the wheel bounced off into grass. I’ve learnt to always look ahead, as well as to not blindly trust unknown paths.[1]
I’ve also realised whom those ‘rut warning’ roadsigns are for—some paths can be quite dangerous in this regard. You don’t want to have anyone overtaking you just as you’re trying to avoid a different kind of disaster, so you need to recognise ruts from a distance, and carefully ride around them without suddenly changing direction. Or take the whole lane for yourself, and go fast enough to not be overly annoying. Or have a thick skin, whatever.
Lights
Finally discovering where EUCs shine, I started looking for more distant targets. Only to find that I could barely see that far, because my V11 didn’t shine enough. It isn’t just about unlit intercity roads—you can’t even see where you’re turning with these vehicles, seeing as they beam in the wrong direction entirely for a moment.
Fortunately, I’m a double Convoy S2+ owner, which can be had on AliExpress. My summary is:
-
Cree XP-L HI might have higher-quality light and better efficiency, but it’s way too focused. In simpler words, you won’t see shit. It’s also too happy to limit power.
-
Luminus SST40 will eat through your cells like there’s no tomorrow, but it makes for a great high beam to have at hand. Just remember to carry back-up 18650s (or whatever size have you, e.g., I have extracted some 16.5 × 65).
In either case, I have found that the fewer modes it has, the better. Otherwise you end up having to cycle through bullshit. Biscotti’s ‘config mode’ is similarly a nuisance, since it’s entered way too easily. I usually don’t have any time to think about such nonsense.
First real crash
This happened in the daytime. I don’t remember a lot from the few important seconds, but I think I was going too fast in an unfamiliar area, and a bump in the road threw me up in the air. In a haphazard manner, I fell forwards. And so I got to test my equipment:
-
My full-face helmet completely saved my head, and only received a small scratch for it.
-
Knee guards saved my knees, though I received large bruises underneath. My particular guards slid downwards on my legs a bit, so my trousers received a minor stain. Hence I’m thinking of upgrading to the popular Leatt Dual-Axis Knee Pads.
-
A basic set of wrist guards was enough to let me slide, rather than to try to break my arms.
-
My swishy jacket also helped me with sliding, and prevented scratches from getting contaminated with dirt, nonetheless getting a bit torn in doing so.
-
Impact shorts have found no use.
Now onto what I should have worn, but didn’t:
-
Torso protection! I bruised my lower ribs, and while I’m not particularly sure of how effective rib protectors can get, anything to dampen the fall would be welcome—it took about three weeks for this injury to stop being annoying. To avoid pain, I had to perform some manoeuvres while laying down, then while getting up from bed.
-
Perhaps firmer shoes, seeing as I rather badly sprained my foot, leaving me lame to some degree for well over a month. The next time I fall, I’ll make sure to avoid landing on my feet, letting knee guards handle most of the energy instead.
-
Some elbow protection would save me from a few scratches.
-
I should have put my mobile phone in its cover, seeing as its frame cracked in two places, and its panel is now adorned with an artifact that luckily seems to have stopped growing.
It could be worse. The V11’s frame got broken, but I could ride back home on it. Which brings me to one lesson I’ve reaffirmed: assume it’s worse than what it seems like, and limit all movement until you know the real extent of your damage. It takes the body about a day to let you know. Essentially nothing hurt initially, I just felt things being a bit wrong.
I wonder if jump pads would have helped in this situation.
Repairs
The machine is fairly repair-friendly, if heavy to handle. Everything is held together using a bunch of hex screws, or occasionally Philips, mostly with the help of blue loctite. Screws can be loosened reasonably easily. InMotion even have a disassembly video. It doesn’t cover everything, but it’s helpful enough.
What I had to replace was a broken upper calf pad, which consists of a hard shell mated with a thick layer of rubber. Luckily, it isn’t at all structural, so seeing that the other side also cracked at the base, I was content with leaving it that way.

Then there was the more serious issue—the magnesium alloy suspension-balancing frame cracked in two places: around one of the two screws that used to attach the pad, as well as on the opposite side of that:

The lift cut-off switch cable doesn’t particularly want to be taken out, and I stripped one side of its grommet. I’m not sure how to properly reseal that one—perhaps with some kind of flat O-ring—or how much I should even care. Note that the silicone in the frame doesn’t particularly need reapplying, there is a pinch point.
The trolley assembly may look intimidating to take apart, but the rods are held in place with grub screws—the same way as they are in pedals. You should be able to push them out with a hex key and a hammer, perhaps with some WD-40 (but replace it with a better lube afterwards). On reassembly, you can use the larger pin to push in the smaller one. Springs don’t pose major issues.
Buyer beware: a ‘European warehouse’ means little on AliExpress, Chinks are likely to send goods to you directly from China. In one case, I had to pay VAT myself (though not the full amount). The store I’ve had this experience with was roughly by the same amount cheaper than their competition, though, making their lying almost excusable.
Upgrades: Honeycomb pedals
While I was shopping, I also ordered original InMotion honeycombs. Here came issues. First off, I’ve noticed that they, for some reason, ship them with screws that have dried-up loctite pre-applied—this cannot really work, since loctite is glue, not teflon tape. Moreover, I was utterly unable to extract the rods holding the original pedals in place. I suspect that they’ve bent from hard drops. Rather than risk destruction, I ordered a new set of ‘pedal arms’, so that I can swap the entire unit. These arrived slightly rusted, and the assembly squeaks without greasing, but… let me tell you, these pedals improve grip like you wouldn’t believe.
Upgrades: Power pads
InMotion pads are kind-of trash, and certainly inappropriate for the V11—there isn’t enough surface for it to stick on, and the EUC’s upper calf pads are too soft and irregular in shape to stick to anything stiff. You will get support for acceleration and jumping, but not for braking. And the upper edge hurts to lean against.
I’ve replaced the layer of double-sided adhesive foil, which can be simply removed by hand, with nearly 3 metres of 3M Dual-Lock reclosable fasteners (6×16 + 2×24 on EUC side, 4×21 + 4×8 on power pads). Trying to remove the adhesive off of the tape with isopropanol actually made it stick to upper calf pads at least a little bit. Alternatively, 3M Primer 94 also works great, just beware that the surface will be shiny and mildly sticky after treatment.
Upgrades: Strenghtening lower calf pads
I came across a 3D model for strengthening the prone-to-breaking clips at the inner side of ‘lower calf pads’, so I decided to try it out. It seems that the model needs to be printed laying down on its to-become outer side—without supports, which are a hell to remove. Otherwise it could be used more or less as printed. I went for a combination of transparent PETG and ASA, for no particularly good reason.
Rather than the suggested epoxy, I used a kind of Ceys superglue that comes with a primer for low-surface-energy materials. We’ll see how it all holds up once I manage to crash the wheel again. Note, however, that those clips seem to break even just due to jumps and similar ‘expected’ shocks. Therefore it’s important to reinforce the pads while they’re new.
There’s just about enough space on the V11 for the reinforcements to fit and slide in. Either way, I haven’t noticed them making any scratches post-installation.

In the photo above, you can also see the InMotion power pads attached, with a strip of retroreflective tape on them to enhance visibility from behind. I’ve used small specks of CA glue on the far ends, otherwise the tape tends to unstick.
Replacing air shocks
I noticed that my air shocks sputtered some kind of oil. Not knowing if this is to be expected, I took on the task of replacing them.
Avoid these
I bought a new pair on AliExpress, first noticing that valve caps are different, looking uglier than the original ones. Also, on the underside, the original ones say FXT, these said nothing. After installation, I then noticed they didn’t work nearly as well as whatever I used to have in my EUC from the factory: positive pressure chambers for whatever reason needed more than double the pressure on both sides.
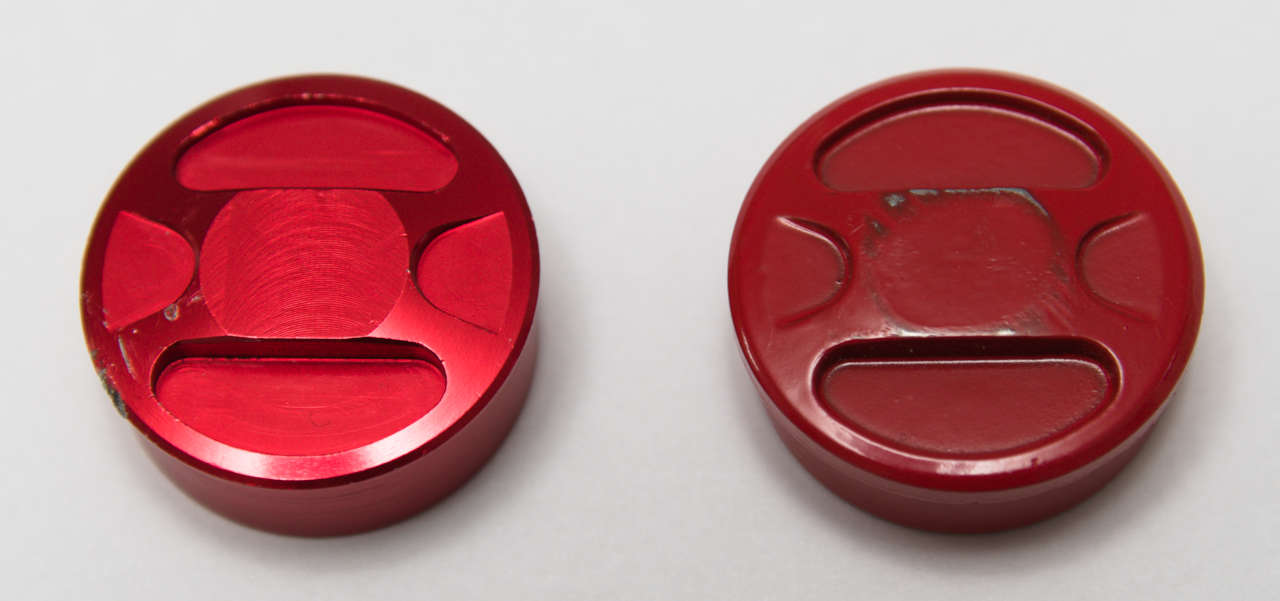
Reinstalling the old ones confirmed that I got scammed, and hadn’t damaged anything. I got two sets of these, and both are the same scam.
Though I suspect the shocks I’ve received might just be for the V11Y, which has a different pressure table, with about doubled pressures. I’ve also noticed that the original InMotion air pump seems to make such a miserable seal that too much air escapes—this might have worsened.
Simplified replacement procedure
This is in principle a straightforward and forgiving operation but there is a way of doing it well, so that you avoid damage, as well as hurting yourself—these steps come from experience:
-
If the new shocks haven’t arrived pre-compressed, compress them! This prevents the most abuse.
One way to do it is to hold a valve core removal tool within the lower valve, and to push the inner cylinder into the lower part against your floor. Alternatively, pump up the upper valve to something silly like 100 PSI or more, then use the valve core removal tool on the lower valve as before—the negative upper chamber should compress the shock by itself. If you use the miserable Inmotion pump, it will get hard to remove the nozzle at such pressures, so let the air out again.
-
In the same spirit, remove side panels, and inflate your old upper valves properly.
-
While holding the inner cylinders of your old shocks steady using pliers (mark the cylinders so that you know if they spin), use a 10mm socket spanner to unscrew the top nuts. Avoid using the 8-10mm open-ended spanner delivered with your EUC, you damage the soft aluminium nut more than needed.
-
Let out all positive pressure from your old shocks, so that they hopefully compress.
-
Unscrew the old shocks at the bottom with a 26mm/adjustable spanner. Because all screw threads tend to get worn out, you may not be able to do most of this by hand. In which case, it’s extremely annoying to use an open-ended spanner. The small one that comes with the vehicle in particular will get you too little leverage to even start. Get a 26mm socket spanner.
-
Let out negative pressure from your new shocks if you haven’t already, and screw them all the way in, but don’t tighten them up yet.
-
Inflate the bottom valves, so that the inner cylinders shoot up. If they don’t find the hole, let out all pressure again, and even remove the valve core, and try to guide the rod with something that’s ideally not your fingers.
-
Finally, tighten up the bottoms, do step 3 in reverse, finalise pressures, and test.
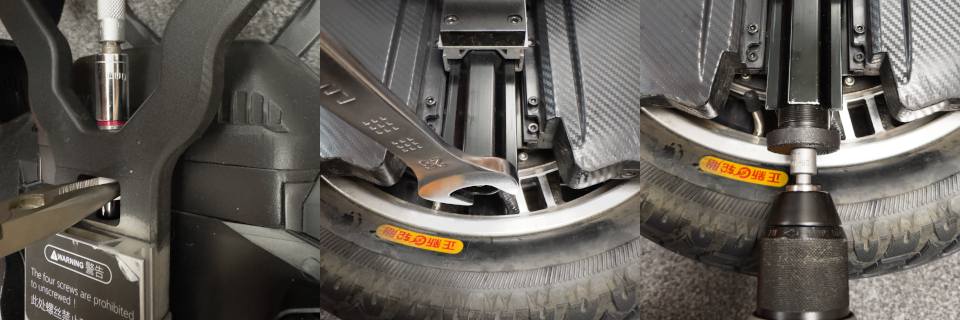
To repeat, avoid using these tools from your V11 accessories: 8-10mm open-ended spanner, 26mm open-ended spanner. These are last-resort, and very inconvenient.
For valve covers, you can 3D print a handy tool. Socket spanners are 3D-printable too, just keep in mind that they’ll be more appropriate for simply unscrewing rather than for loosening. I stopped breaking the 26-to-10mm PLA spanner pictured above after I limited my cordless drill to about 10 Nm.
The suspension system on this wheel seems quite flimsy—not only because of the fiddly air pressure adjustments, but also in that it’s quite a wonder that this mechanically withstands 100kg people jumping on it. On my next wheel, I want springs.
I’ll update this page as I gain more experience.
1. Punny, isn’t it. I was supposed to see it in front of me, but I actually trusted it as if I were blind… alright, never mind.
Comments
Use e-mail, webchat, or the form below. I'll also pick up on new HN, Lobsters, and Reddit posts.