Keyboards are a trap. After I spilt Kofola on my old Acer laptop, and had to use a shitty external Genius KB-120e, I kept desiring something else every once in a while. At the beginning of my mechanical journey, I got myself a Razer BlackWidow Tournament Edition, however I could barely type on the (loud) Cherry MX Blue switches for some reason. So I changed to Cherry MX Brown, and ran through a few other ‘tenkeyless’ keyboards. I finally felt content again.
Still, I longed for something shallower. The Cherry G84-4100 with Cherry MLs was sadly not an answer to that itch—I hated that keyboard through and through.
First, the switches. Cherry ML have often been described as ‘scratchy’, and that they are. If you don’t press the key dead centre, it’s going to resist hard. I tried lubing the stems (only the visible part as they’re nearly impossible to open) but to little avail. The much bigger MX switch doesn’t have this problem.
Another feature I wasn’t not too happy about is the use of XT-style Caps Lock, Backspace and right Shift keycaps instead of installing some damned stabilizers into the mount holes in the PCB. I could tolerate that however, since at least it makes it easier to recognize the keys by touch.
My biggest problem though was probably the electronics. My unusual layout (see below) seems to be something engineers didn’t count with, and QC didn’t test. For example, I can’t type Ž (left Shift + AltGr + /) because it turns on Caps Lock instead. And when I type sequences like chl (ijp) or whi (,jg) fast, it inserts a Caps Lock before the third key press. Those are pretty common in Czech and English respectively.
Abandoning the low-profile dream, I eventually learnt of ortholinear keyboards, where keys are placed in a regular grid, and decided to order a Hi-Pro Preonic. When it arrived, I almost gave up on it immediately, as the layout change was fairly substantial, and I found it really difficult to type on. But I persisted, and even went as far as to get rid of another row of keys, buying a Planck EZ. I may have mixed feelings about the materials used there (plastic body, bad rubber feet staining the desk), and originally had issues with firmware (upstream QMK used to not work), though I’ve found my ideal keyboard format.
Since I immediately started hating the Preonic for its unreasonable excess of material, and didn’t want to carry the one good keyboard with me everywhere, I ordered a Mid-Pro Planck from Drop, which you can see in the "battlestation" page. It was comfortably small (the Mid-Pro variant also has the top of the case level with the plate, whereas the Hi-Pro is slightly raised), again made of actual metal, and pretty.
As that still wasn’t enough of things to type on, about half a year after that I cannibalised the old Preonic for switches and blank Acute keycaps, and put them in a new Planck that happened to be available for sale. This is now my favourite Cherry MX keyboard:
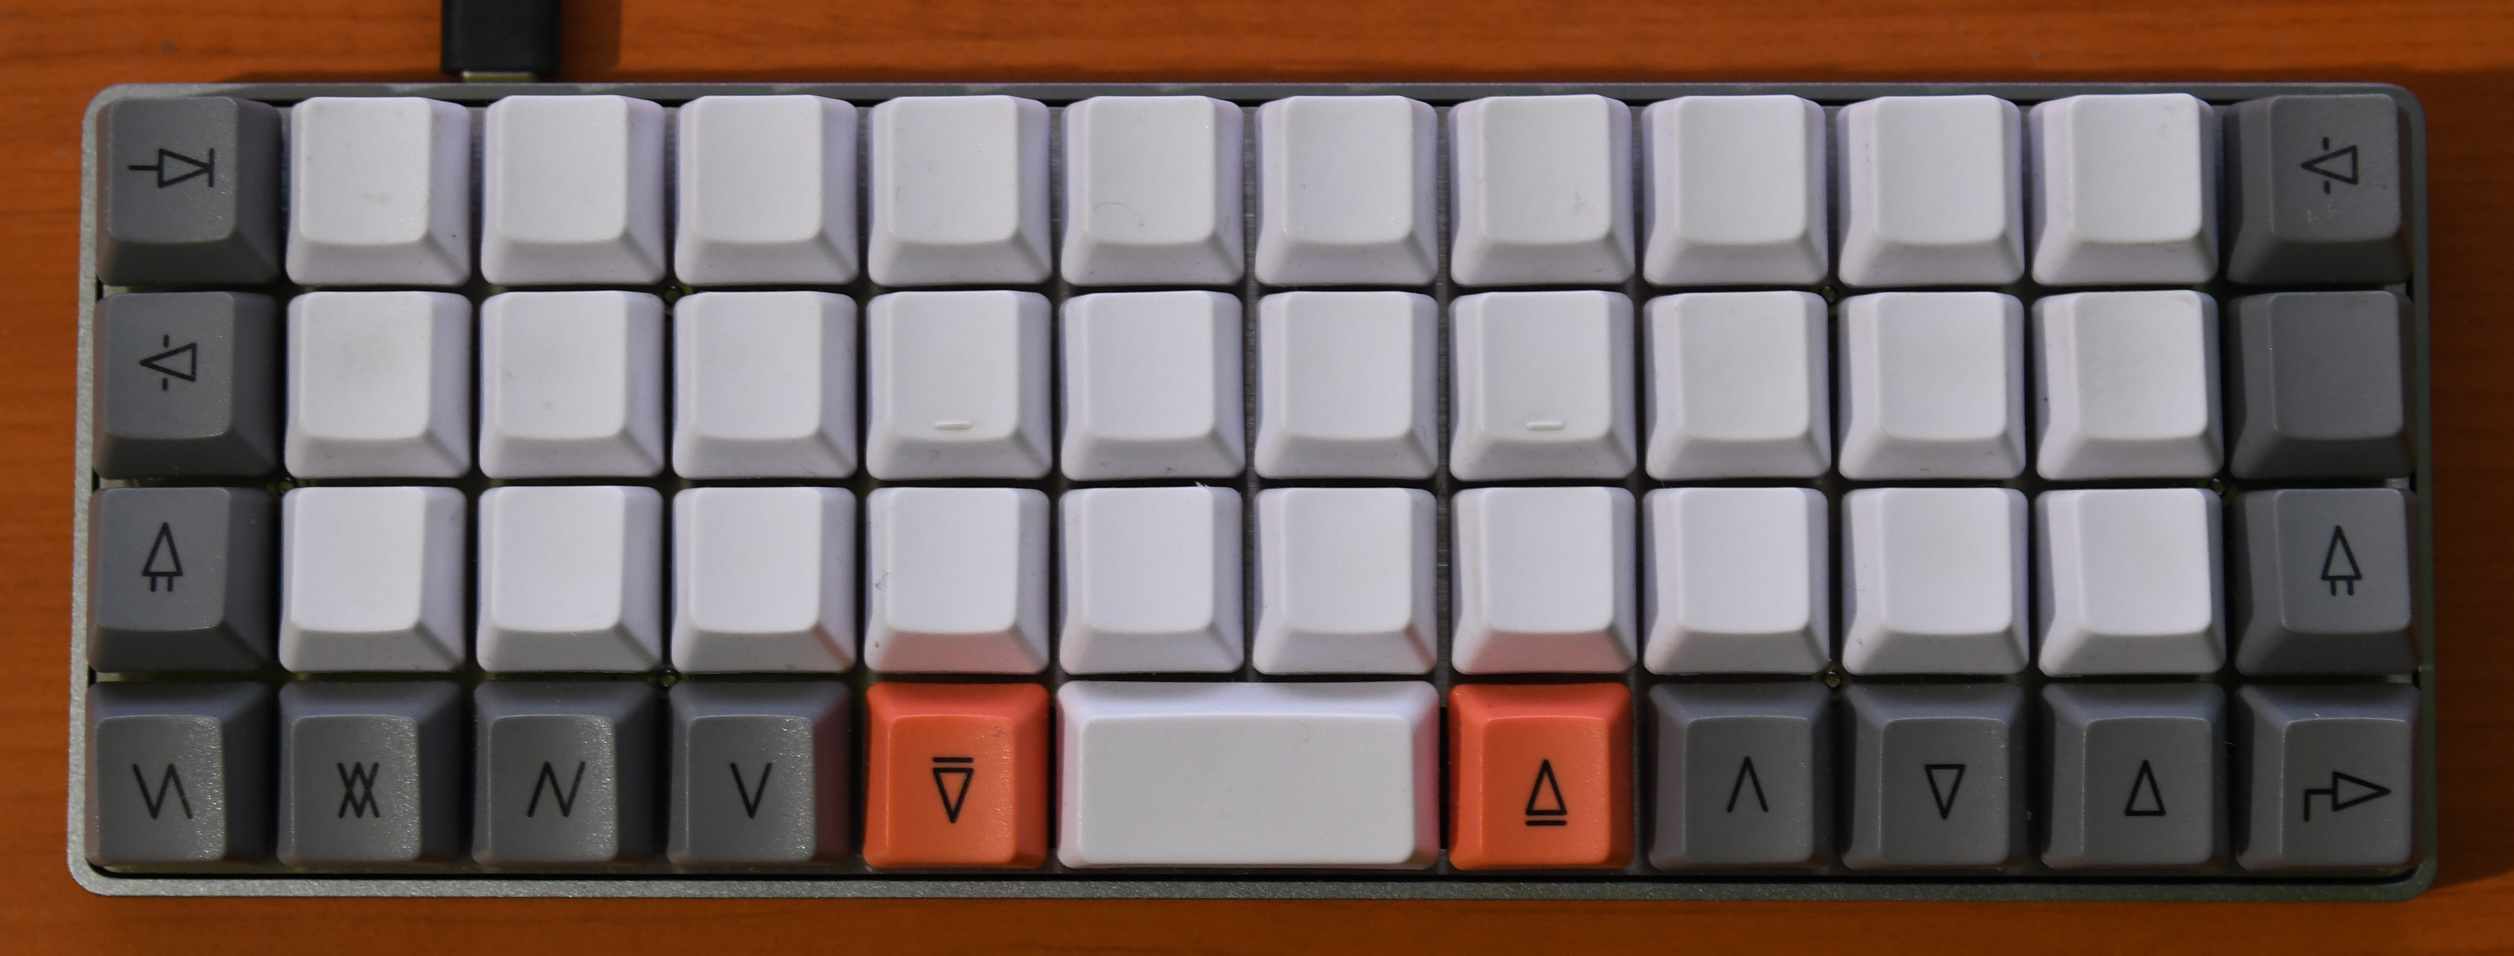
Finally, when I got sick of QWERTY labels on my older green Planck, and gave up on hoping to see the blank Acute keycap set ever available for buying again, I’ve had a custom set made. YUZU Custom Keycaps seemed to be the best compromise between price and what I wanted. Given that they print all keycaps using dye sublimation over a white PBT base, and thus that labelled keys cost the same as blanks, I decided to put Dvorak labels on them in my favourite font, Futura:
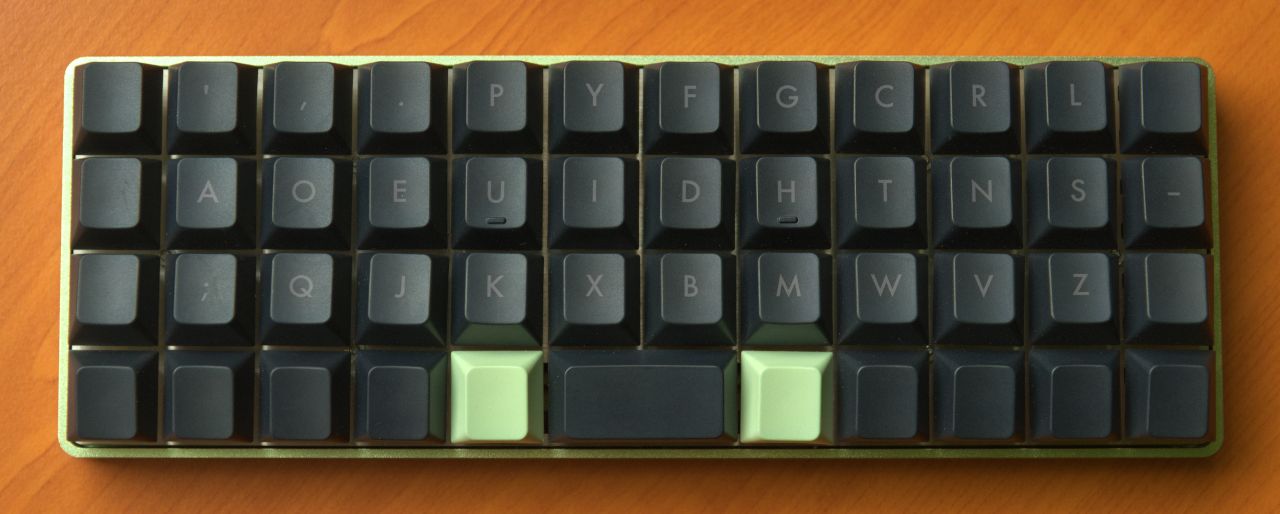
It looks a bit weird in black, but it’s an improvement. If I wanted to get white keys, I’d consider the laser printing service of fkcaps.com, which can interestingly put labels on the sides, Filco Majestouch Ninja style. OLKB is niche, so keycaps are somewhat difficult to source, printed or blank. Especially the concave 2U bottom row space bar.
As of 2026, Massdrop/Drop is defunct, the ZSA’s Planck EZ is discontinued, and the guy behind olkb.com no longer sells parts. You can at best find some mini-USB Plancks on eBay. So I’m in possession of irreplaceable rare items that I depend on. At least they last approximately forever.
(My orange Preonic is up for sale, including two sets of Acute keycaps.)
Eventually curiosity lead me to build a Levinson keyboard, with Kailh Choc Burnt Orange switches. I’ve stopped using it since. I suppose I’d rather have an OLKB version of the MacBook keyboard, which I find quite good, at least for shorter typing sessions.
I’m now happy with Cherry MX Clear, which is a great typist’s switch. Browns felt too soft.
One of the Plancks sold with Halo Clear switches instead. Those are considerably louder, and the feeling you get typing on them is nowhere as neutral—often they seem too stiff, yet at other times enjoyable. I suppose there’s a lot of room for exploration.
The OEM profile of the Acute set is great. The Cherry profile that I got from YUZU is roughly the same, though a little bit shorter—as if missing the OEM profile’s ~2mm base. This creates sharp edges, which get unpleasant to touch, but you’ll only have this problem with cases that allow you to do so, such as those Mid-Pro OLKBs.
Inverting the bottom row of these sculpted keycap types is much more comfortable for thumbs, and highly recommended.
During high school, I started experimenting with drugs the Dvorak Simplified Keyboard layout. In university, I progressively started accepting it as my main one, then later converted fully, and for the most part forgot Sholes.
The reason? Just like with OLKB’s reduced number of overloaded keys, I simply find Dvorak more comfortable—I’m too lazy to move my fingers around unnecessarily. It didn’t improve my typing speeds at all.
Why choose this layout rather than any different odd one? For one, Dvorak is widely supported on various operating systems by default, even on iOS. If you speak something other than only English, *nix distributions come with many localised variants. I’ve just had to port the Czech dvorak-ucw layout to Windows and macOS. Another selling point is that surprisingly, VIM bindings still happen to make sense.
Of course, there are also downsides. Like I mentioned, once I stopped using the standard layout, I have forgotten it. And so just like other people can’t use my computers, I can’t use theirs, unless I bring one of my keyboards with me—my QMK keymaps have a mode that moves keys around to where I expect them.
A simpler thing that improves ergonomics a ton is swapping Ctrl with Caps Lock. It makes one unafraid of Emacs RSI. You can do this remapping OS-wise on both Linux and macOS, but sadly not on Windows. Which is one reason I don’t ever want to touch a laptop with Windows again.
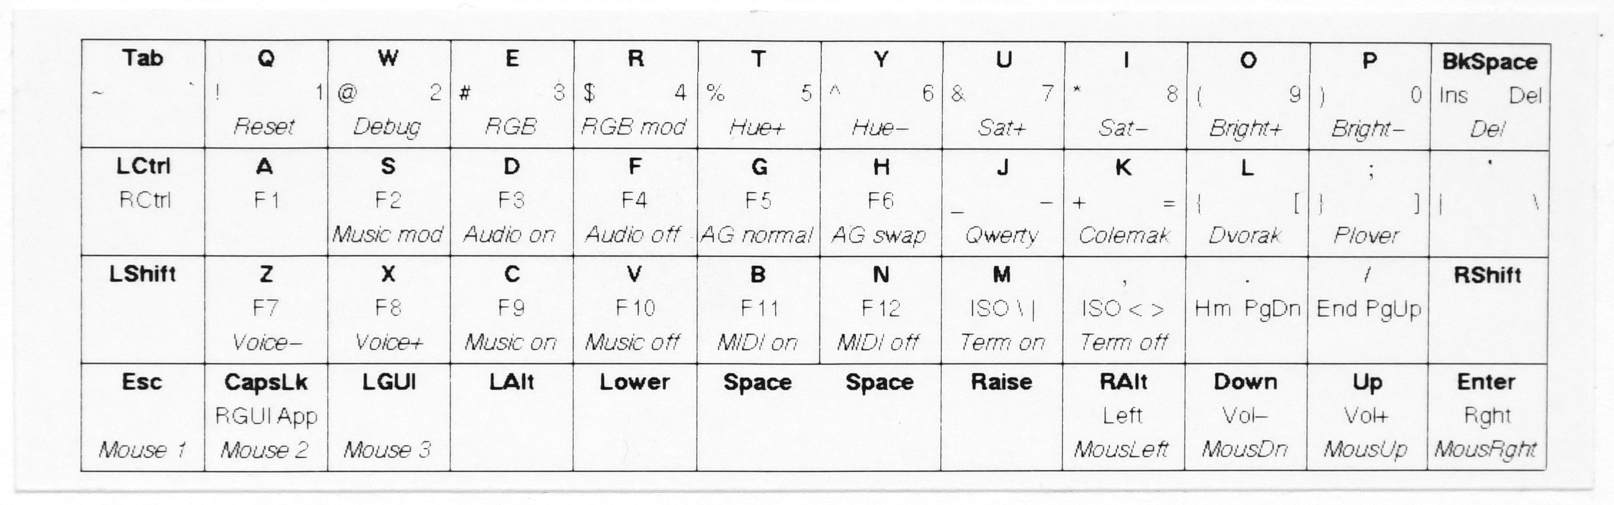
I’m not missing any usual keys on the 40% keyboards (I’ve even mapped Print Screen/System Request, Scroll Lock, and Pause/Break recently). The keyboards can even act as a virtual mouse. But I tend to forget where everything is bound, especially on the "adjust" layer, where all configuration is done.
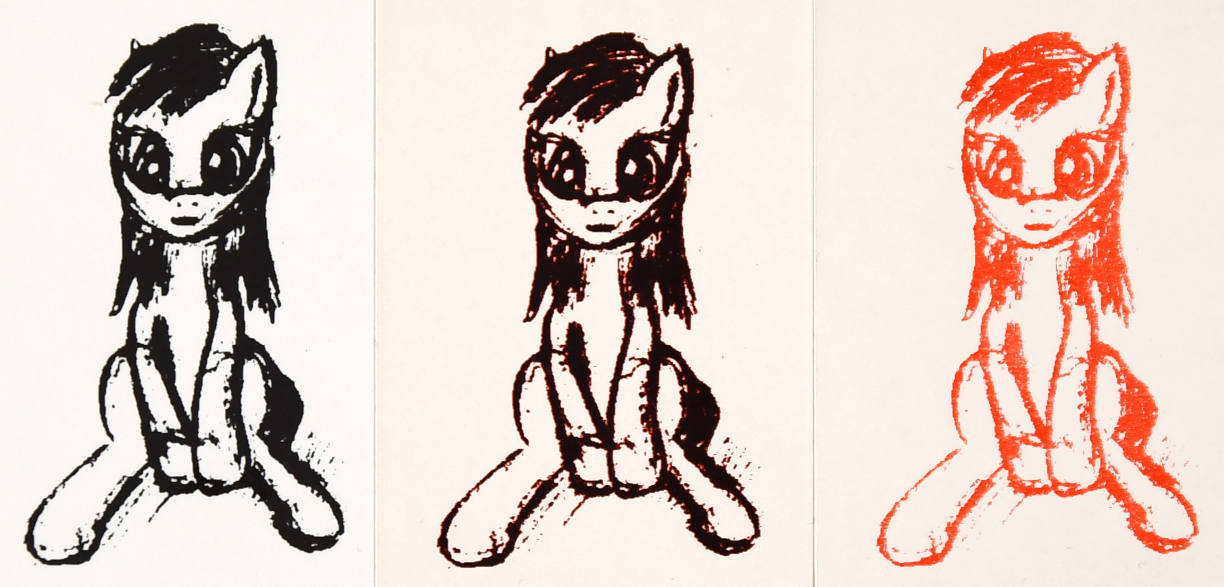
I have a Brother QL-800 label printer, including most of its sample 62mm red/black tape, so I thought of adding a legend to the back side. With some effort, I’ve hacked together a Go program to create the appropriate picture directly from keymap.c snippets. Unfortunately, two problems arose when I tried to print it: first, a sideways print is extremely large (I don’t want to cut the label to size manually), and second, that tape sucks—black strokes are red-tinted on the edges, and red prints so weakly that thin strokes are almost invisible.
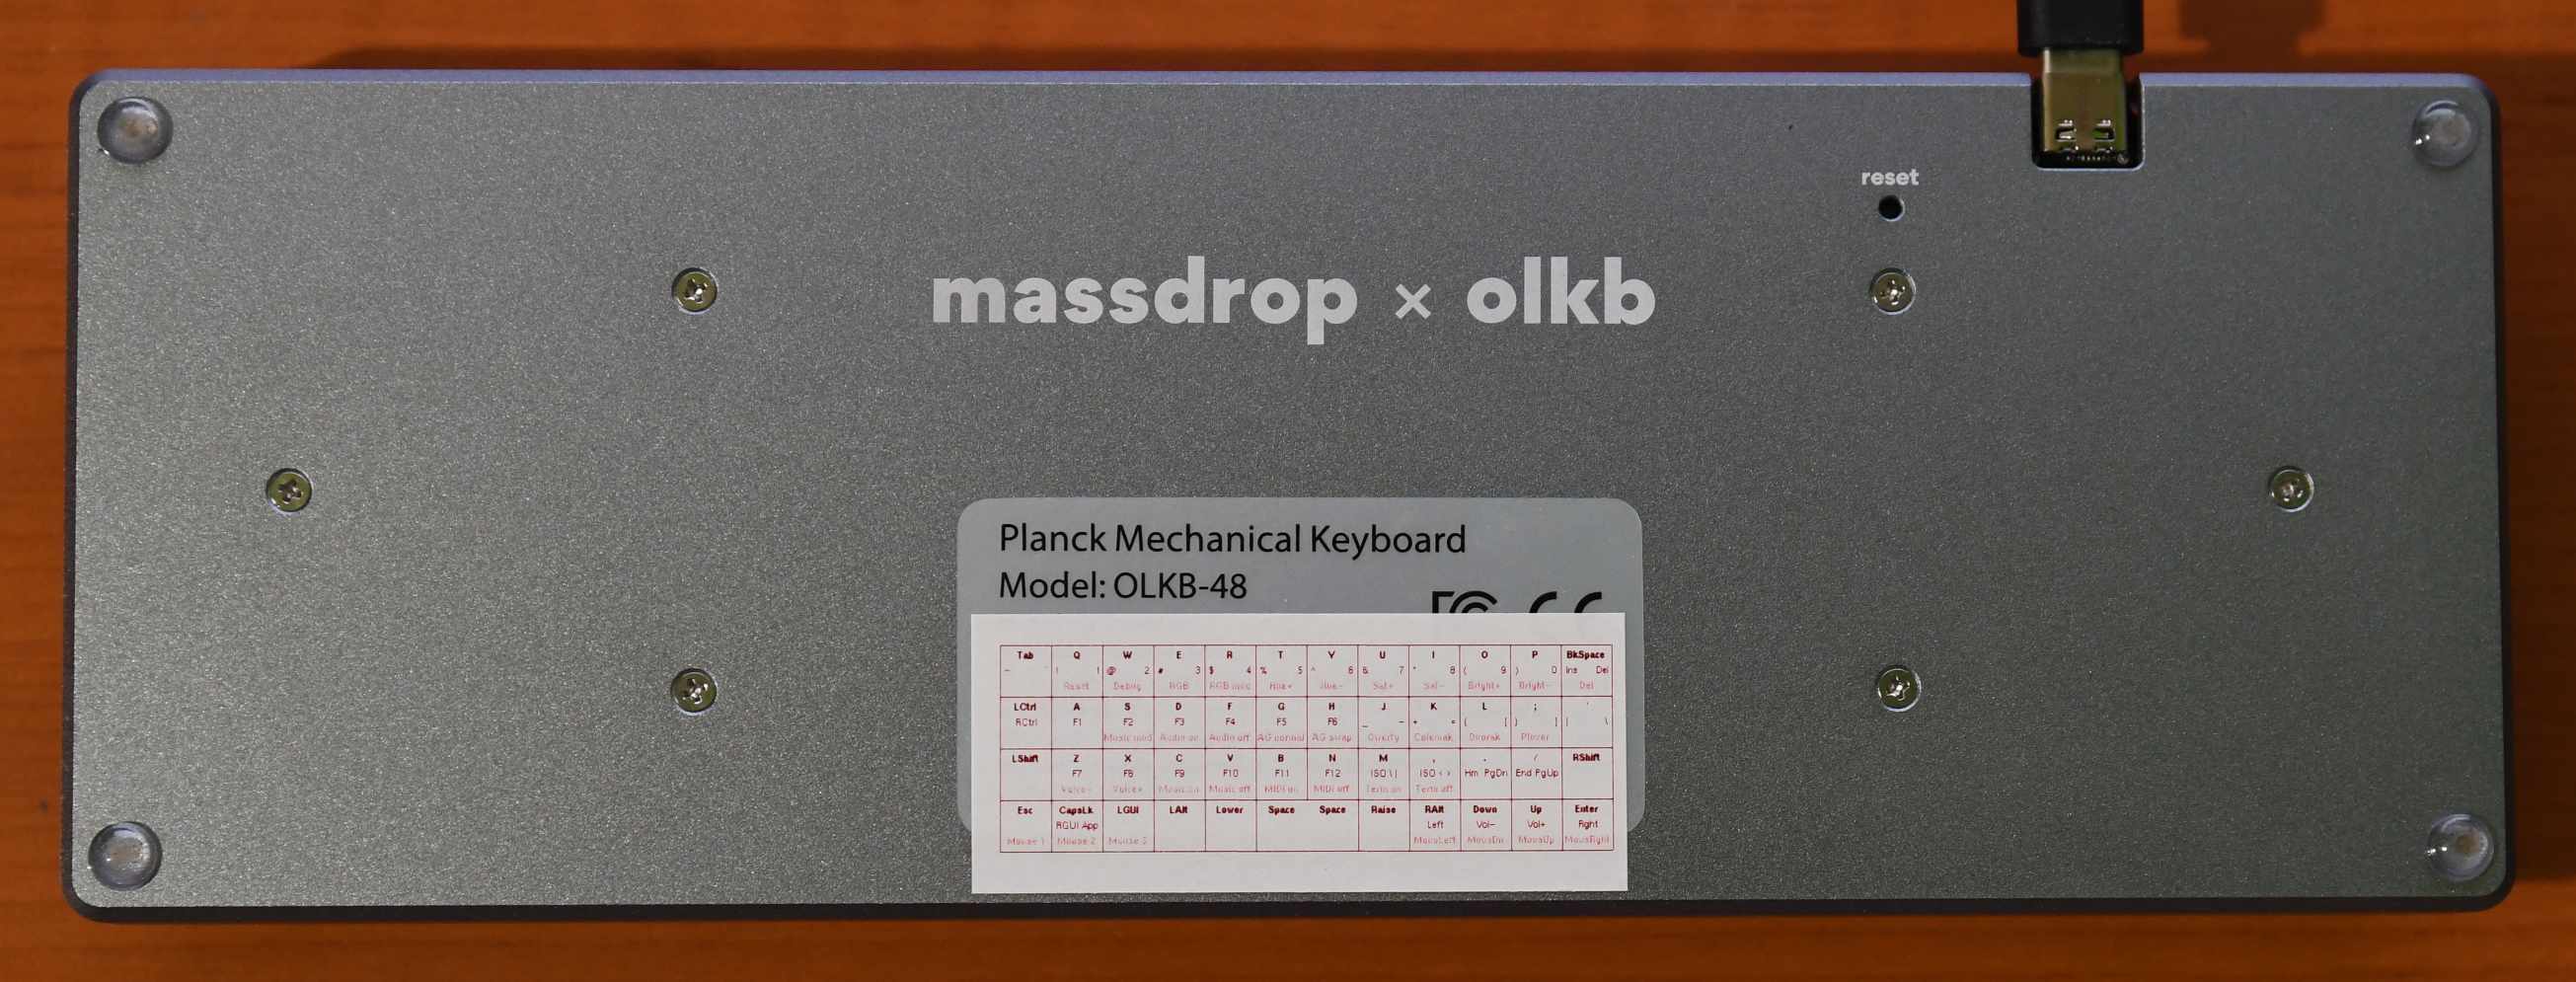
So I switched back to my 29mm black-only tape. The print happened to be somewhat larger there, though much to my surprise, also less readable. The sad conclusion is that the sharpest and most compact results are provided by printing black-only on a red/black tape, because of the otherwise undesirable red halo. You can’t have it all.
The effect on pictures is a bit more complex (notice the yellow tint of the red/black tape, which is also slightly glossy):
The print density setting might be of help, though "ESC i D 0x01–0x05" didn’t change anything, the configuration report printed after holding the cutter button doesn’t even mention it, and I don’t know how I would go about changing it otherwise, without going the trouble of connecting the printer to Windows.
I used to be very fond of SteelSeries Sensai RAW mice, however these tended to not survive too long, as the very comfortable rubber surface would soon rub off (hah), and all switches like to die. They would also squeal when you moved them (it’s a mouse, duh), likely because of some capacitors exhibiting a piezoelectric effect.
What’s most important about this device is its distinctive feature: Page Up and Page Down buttons on the right side of it, simulating key presses. This is highly addictive, and I can only hardly imagine using a mouse that doesn’t have these buttons. Which makes most of the market completely irrelevant to me now. I need that turbo scrolling.
After I started getting heavy doubleclicking in my last decent Sensei RAW, I decided to replace it with the closest thing: its direct evolution. It looks and feels about the same, with only a few cosmetic changes. On the inside, though, they seem to have changed a lot more, and so my control program no longer works.
Repairing the mouse is extra annoying, because you must be extremely careful to not overtighten screws going into the translucent bottom part. You still probably will, making it crack. Superglue mostly works.
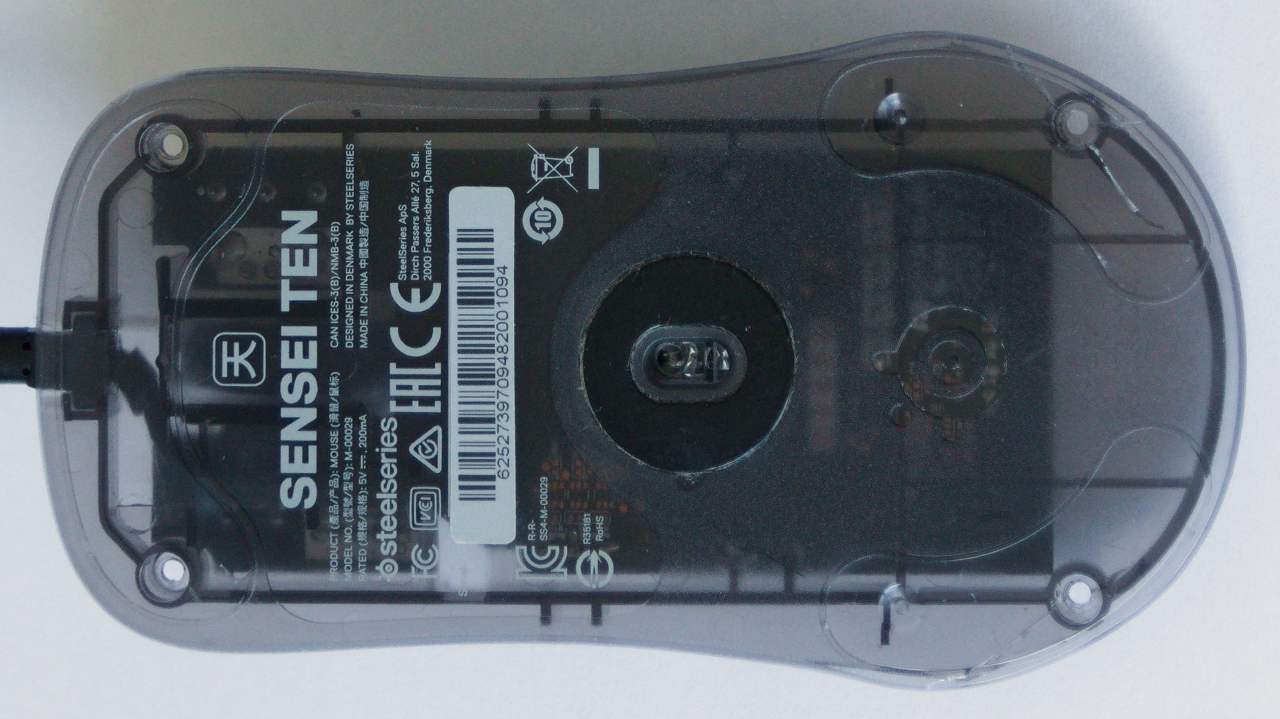
Steelseries have stopped making this model with no successor, so I’m close to feeling completely lost in my life, once spare parts disappear.
This mouse can be configured with https://github.com/flozz/rivalcfg on Linux.
I can extend sensei-raw-ctl to be able to control the newer mouse as well. Though given that there are noticeable differences between the available settings, it might make more sense to make an entirely new program for this.
One can consider Go, however among the better libraries out there are only:
and they all want to link with C libraries, so I might as well continue using C.
Another reasonable option, although it is a lot more work, is to add support
to libratbag, and configure my mouse using the ratbagctl utility.
From time to time I look for viable replacements for the One Correct Mouse, and this one gets close. It works over USB, over Bluetooth, and over a wireless dongle.
The biggest problem with it is that the two programmable right-side buttons do not support key repeat. Followed by the buttons not working over Bluetooth. Third, the dongle does not report battery status. Effectively a wired mouse.
The thing that seems to fail the most often. At first, I tried fixing my Sensei Ten wheel encoder by drenching it in IPA, though that only helped for about 1½ years. Looking for a longer-lasting solution, I then tried replacing the black-core, sealed 9mm Kailh encoder with a new, similarly-looking Kailh CEN98 Series one. That lasted ¾ of a year. Kailh clearly sucks at this.
The original M600 encoder—I don’t remember who made it—failed twice for me. The first time after just ½ a year, so I RMAd the mouse, and got a replacement. Again, it lasted less than two years. Note that it uses a 15mm encoder, where you don’t have a lot of choice around brands.
As of writing, I have dust-proof TTC Gold in both the Sensei Ten and in the M600. This is a loud encoder, but there’s a satisfying quality to the sound. It appears to be reliable so far (counting since 2026/02 and 2025/07 respectively).
Should that fail me as well, I have some 9mm ALPS EC10E in stock for the Sensei. I expect the Japanese to watch their quality better.
The best way to replace rotary encoders seems to be to just cut the legs, and pull them out in parts, because by trying to remove the part whole you risk damaging the PCB—the side legs do their job well. You still need to clear the holes of solder for the new part. It’s a bit fiddly, but even with time accounted for probably cheaper than an entirely new device.
I should have acknowledged that this is an option a long time ago—the failing parts are cheap, and highly generic.
The most annoying part of repairing computer mice is reapplying mouse skates, which typically hide the screws you need to remove, and get irreversibly bent upon removal. Old glue residue doesn’t want to come off, and you’re somewhat lucky if you can find replacement skates on the market. They’re basically just PTFE stickers, so you can try to match the shape and cut them out from a larger sheet. With a hobby knife, not scissors. Also, if you know where the screws are underneath, it’s possible to make holes right above them. Which is a big if, but you’ll solve the problem for good.
See the "battlestation" page about graphical tablets.
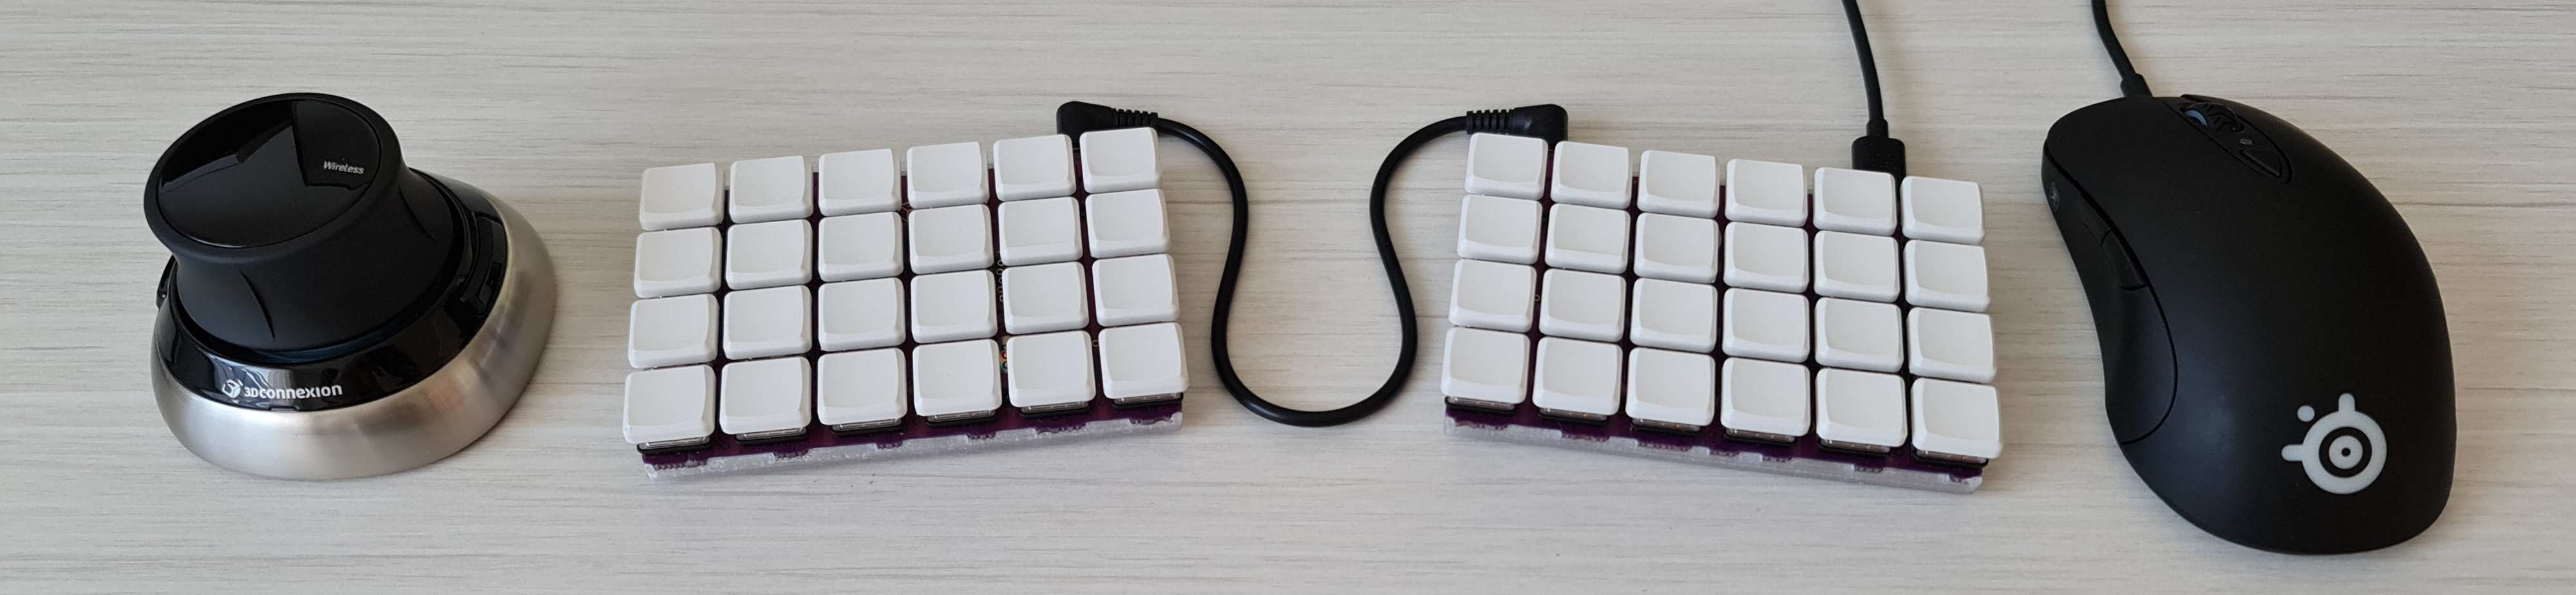
See 3D printing notes about the 3Dconnexion SpaceMouse.
Comments
Use e-mail, webchat, or the form below. I'll also pick up on new HN, Lobsters, and Reddit posts.